Typical flow: configure fees → import accounts + unique proxies → wait for Steam/marketplace login → set min/max → workers list and compete → collect balance to the main account.
Pricing
BuyCS2-only is free. Paid slots apply when you also use the integrated marketplaces.
BuyCS2 only
Free. No extra charge if you only use BuyCS2.
CSGOTM / WhiteMarket / ShadowPay
Paid when you also use any of the three integrated marketplaces.
Accounts
Price
50
$75
200
$120
400
$160
600
$200
800
$240
1000
$280
+$40 per additional 200 slots
Initial configuration
After you log in, open Settings from the top-right user menu. Do these steps once before importing accounts.
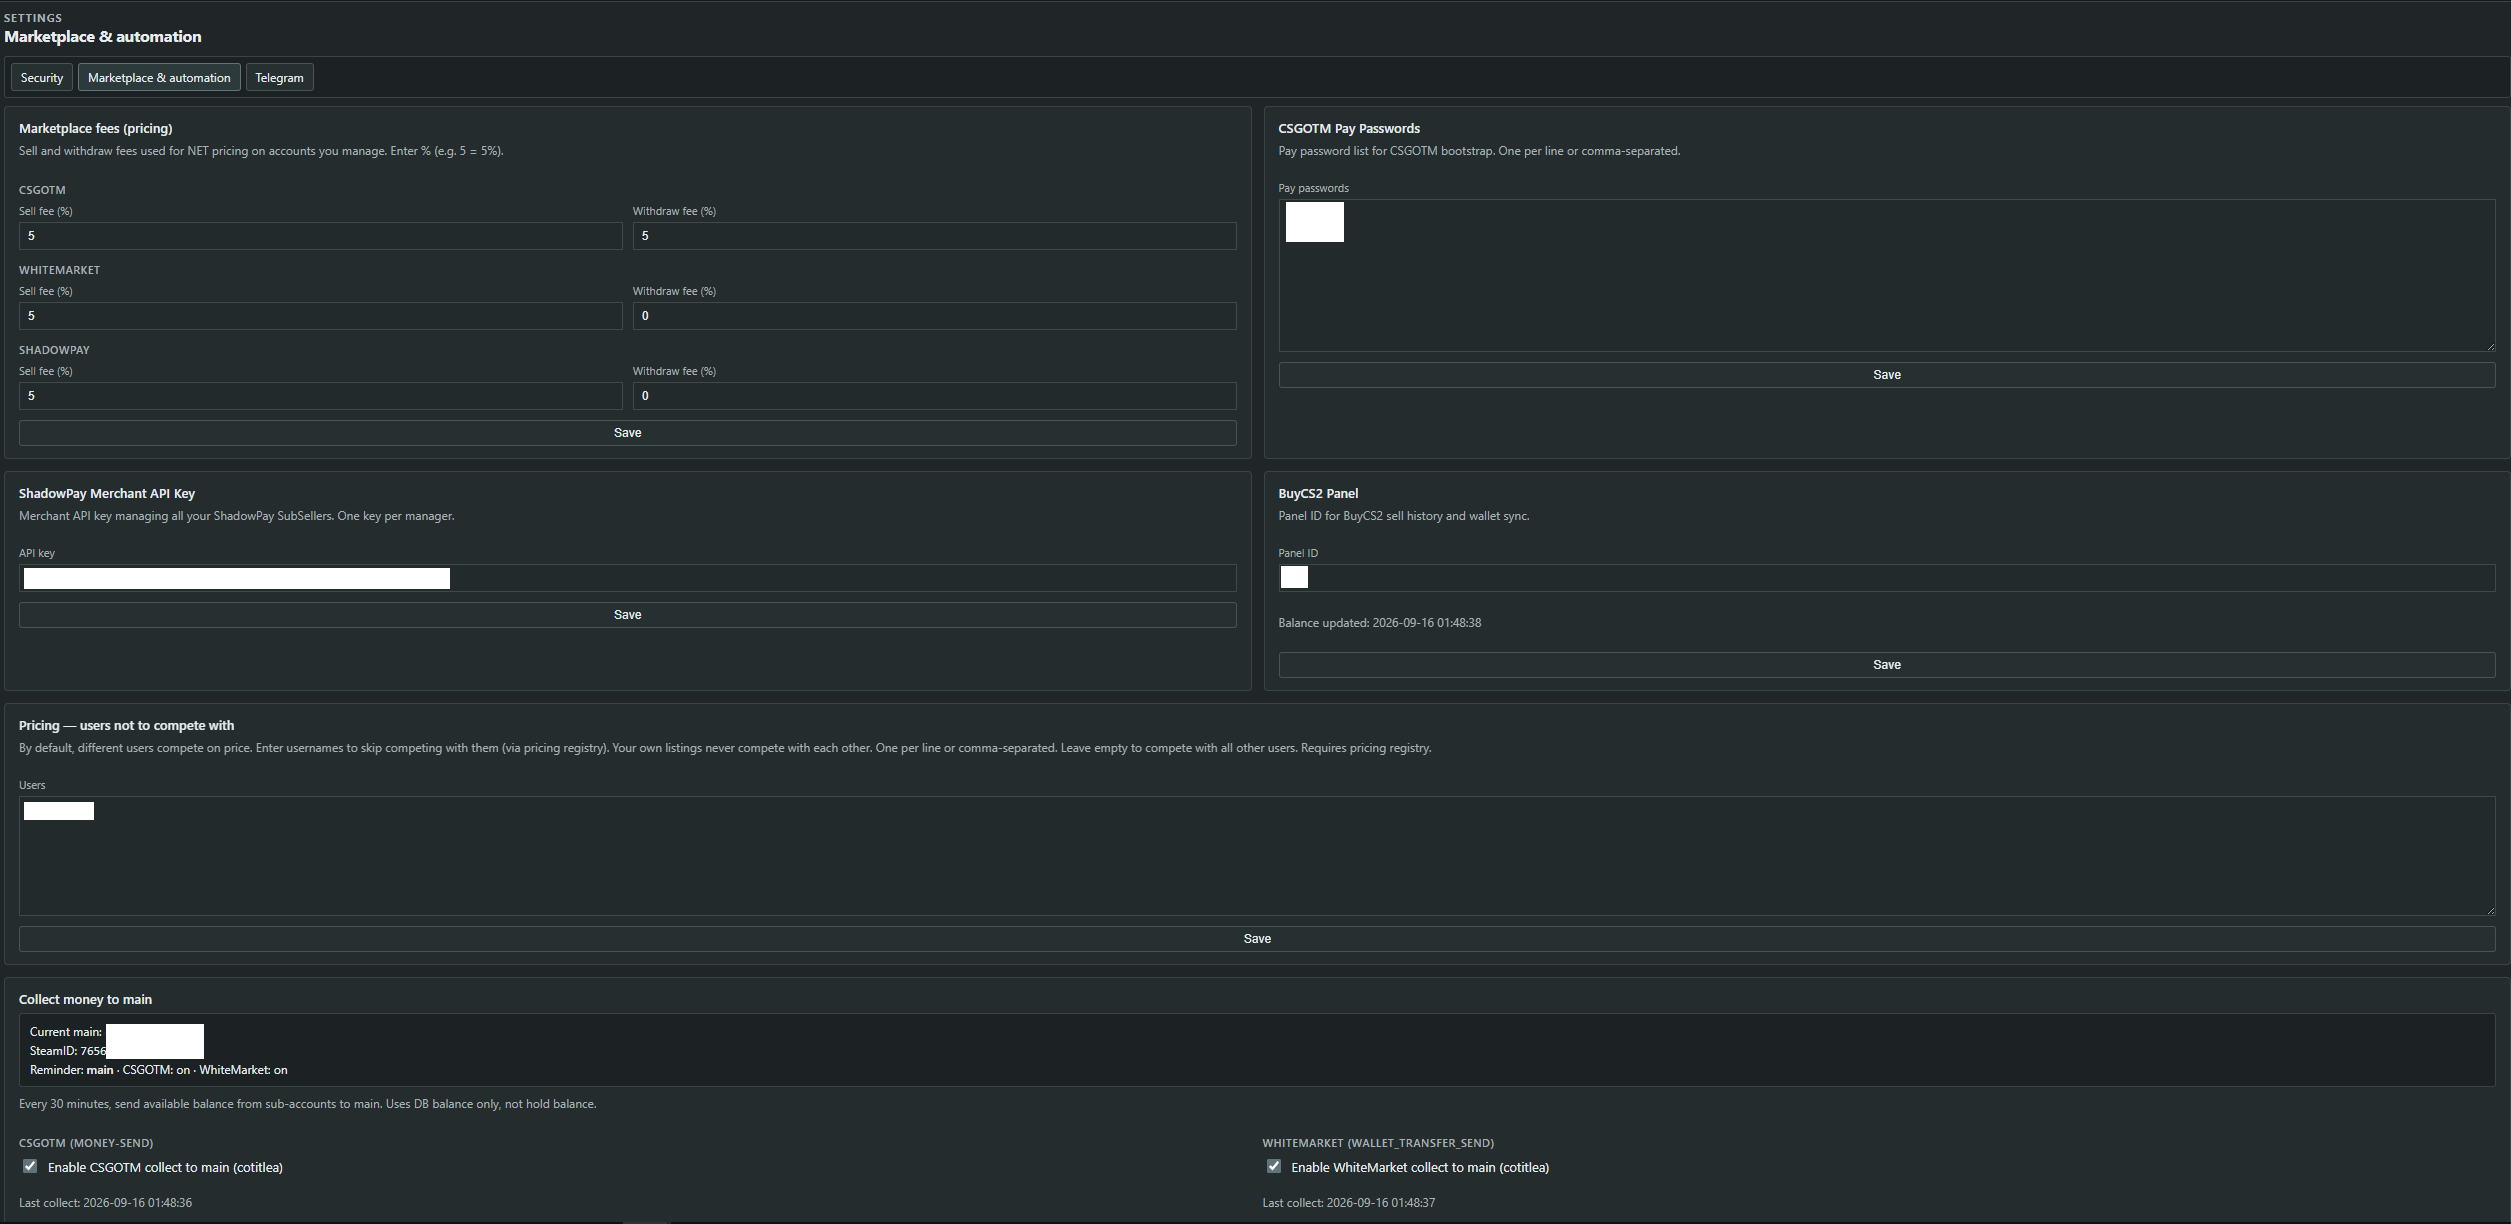
Path: Settings → Marketplace & automation
🖼
Drop this screenshot into public/assets/guide/
settings-marketplace.png
Settings → Marketplace & automation
1. Marketplace fees
CSGOTM default: sell 5% · withdraw 5%
WhiteMarket default: sell 5% · withdraw 1%
ShadowPay default: sell 5% · withdraw 5%
Defaults are compatible starting points. Change them if the marketplace fee changed.
2. CSGOTM pay passwords
On the same tab, fill CSGOTM Pay Passwords — 6-digit codes, one per line or comma-separated. BuyCS2 trade server installs a password from this list on each CSGOTM account so it can transfer balance to your main account later.
Invent any 6-digit codes. They are not your Steam password.
3. ShadowPay merchant API key
If you sell on ShadowPay, paste the Merchant API key that manages all SubSellers. One key per manager.
4. BuyCS2 ID
Nothing to ask for. The BuyCS2 Panel ID is filled in automatically when an admin enables BuyCS2 selling for your user. Once it appears here, BuyCS2 sell history and wallet balance sync on their own (about every 15 minutes).
5. Users not to compete with
By default other users compete on price. Your own listings never undercut each other. Enter usernames (one per line) to skip competing with those users. Leave empty to compete with everyone else.
6. Collect money to main
Optional. Every 30 minutes BuyCS2 trade server can send available CSGOTM / WhiteMarket balance from sub-accounts to your main account.
7. Telegram bot (recommended)
Path: Settings → Telegram
Open @BotFather in Telegram, send /newbot, copy the bot token, and click Save token.
Click Create bind link and open it in Telegram. The link expires in about 10 minutes.
Wait until status becomes Linked. Account ZIP downloads go only to this chat.
When the bot is linked, it also sends an alert for every login attempt — success or failure (wrong password, 2FA, blocked IP).
Set a ZIP password (at least 8 characters) so a stolen Telegram session cannot read exported accounts. Open the ZIP with 7-Zip or WinRAR.
8. Security
Path: Settings → Security
Change the default password and enable 2FA. Save backup codes once — they are shown only at setup. API keys are created on this same tab (see API documentation).
What is a proxy
A unique HTTP proxy is required for every account. Without it BuyCS2 trade server will not import the account.
Each account must talk to Steam from its own IP. If many accounts share one IP, Steam can link them and ban the whole group when one account looks suspicious.
Rule: 1 proxy = 1 account. Do not reuse a proxy across accounts.
Format
BuyCS2 trade server accepts HTTP proxies only, in this form:
SOCKS, user@host, or missing user/pass lines are rejected.
Where to buy
Buy the cheapest HTTP IPv4 proxies that work, for example at webshare.io. One unique proxy per account is enough.
Protocol: HTTP (not SOCKS-only)
Type: IPv4, one dedicated IP per account
Export as host:port:user:pass and paste into Import or the proxy column
How to assign later
Double-click the proxy cell on an account, or
Right-click → Change proxy (bulk editor if several rows are selected)
The proxy column shows live/die and latency after the worker checks it. A dead proxy stops Steam jobs for that account until you replace it.
API documentation
Everything you do in the browser can be done programmatically. The website uses a login cookie that expires. An API key does not — send it on every request.
Path: Settings → Security → API Key
Create an API key
Open Settings → Security.
Click Create API key. The full key is shown once — copy it immediately.
Later you can Show key (password required), Regenerate (old key dies), or Revoke.
Optional: fill Allowed IPs (one IP or hostname per line) and save. Empty allowlist = any IP. A request from a non-listed IP returns 403.
Send x-api-key and x-username
Add x-api-key to every call. Also send x-username with your login username when the request goes through the hub. The hub returns 400 if that header is missing. Do not put the key in the query string. A call straight to your own server still works with only x-api-key.
On error: success: false, msg is the reason, HTTP status is 4xx/5xx.
Rate limit
Each username and each IP address can send 600 requests per minute. Past that, the API responds 429 and does not run the request. msg says how many seconds to wait.
{
  "success": false,
  "msg": "Too many attempts. Try again in 12 seconds",
  "data": null
}
How to learn any method
There is no need to memorize every route. Repeat the action in the UI and copy the request:
Press F12 (or right-click → Inspect) and open the Network tab.
Do the action in BuyCS2 trade server (refresh inventory, set min/max, import, …).
Click the /api/... row. Note method (GET/POST), URL, and Payload (JSON body).
Replay that URL + body with the x-api-key and x-username headers instead of the session cookie.
Import accounts
Add accounts only with Import account on Accounts → Steam Manage. Single or bulk.
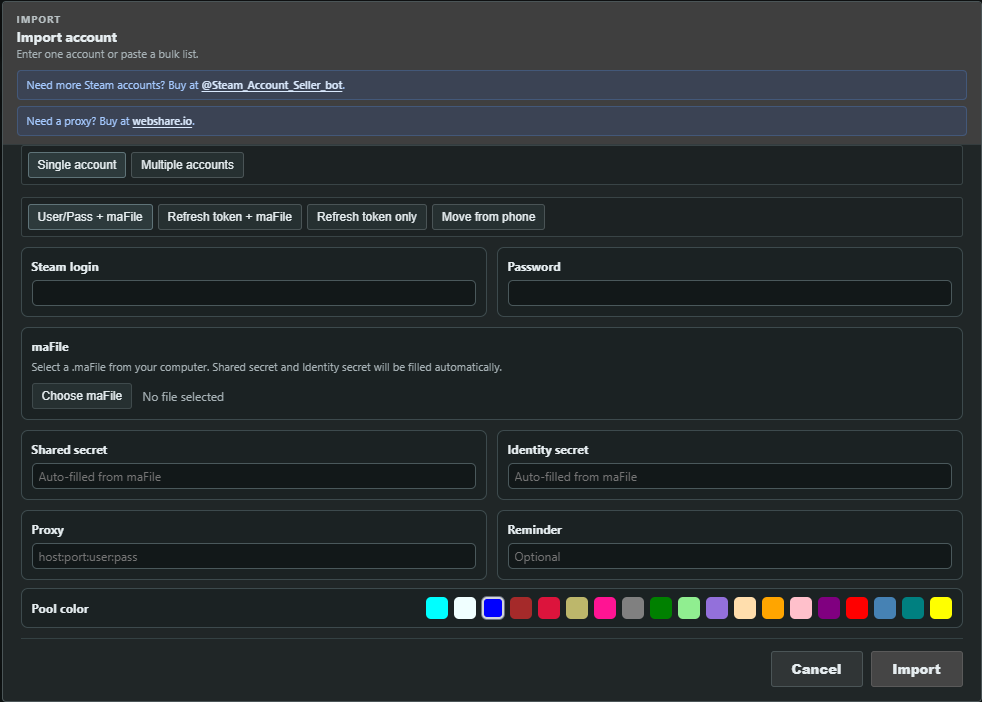
Path: Accounts → Steam Manage → Import account
BuyCS2 trade server can import thousands of accounts easily. Buy accounts from the Telegram bot @Steam_Account_Seller_bot. Need proxies? Buy cheap HTTP proxies at webshare.io in host:port:user:pass format.
🖼
Drop this screenshot into public/assets/guide/
import-single.png
Import → Single account
Single account
Pick one of four modes at the top of the form. The server does not store the mode; it works out what the account can do from the data you gave it.
User/Pass + maFile — login, password and .maFile. Full automation: the worker logs in by itself, renews the session when the token dies and confirms trades with SDA.
Refresh token + maFile — login, a MobileApp refresh token and .maFile; password optional. Trades are confirmed automatically. Without a password the worker cannot log in again once the token expires or is revoked — paste a new token from the context menu.
Refresh token only — login and refresh token, no maFile. The worker keeps the session, syncs inventory, lists and sends trades, but you confirm each trade yourself in the Steam mobile app. The maFile column shows —. After you confirm an offer, your tool can call POST /api/trades/mark-confirmed with {"items":[{"tradeOfferId":"…"}]} so the SDA column turns green. To automate later: right-click → Action with Steam → Change maFile secrets and Change DB password.
Move from phone — login and password, no existing maFile. Steam Guard must already be on the phone, and the account needs a verified phone number. Click Move; Steam texts a code to that number. Enter the code to replace the phone authenticator with a new maFile and import the account. Download the maFile and keep the revocation code — it is not stored. Trade hold is about 2 days, and the authenticator on the old phone stops working. After that, the worker can log in and confirm trades the same way as User/Pass + maFile. Single account only — this mode is not in the bulk paste.
Required in every mode:
Steam login
Proxy host:port:user:pass
maFile — for User/Pass + maFile and Refresh token + maFile, choose a .maFile / JSON. Shared secret and Identity secret fill automatically; you may paste them by hand instead. Both secrets must be base64 of 20 bytes, and you need both or none. Move from phone creates the maFile for you. Refresh token only does not use one.
Optional: reminder (short label in the table). The refresh token must be a MobileApp refresh token (not a web/client token, not an access token) and must not be close to expiry. The SteamID is read from the token, so inventory and trade jobs can start right away.
Pick a pool color at the bottom. Color groups accounts for filters and for auto min/max.
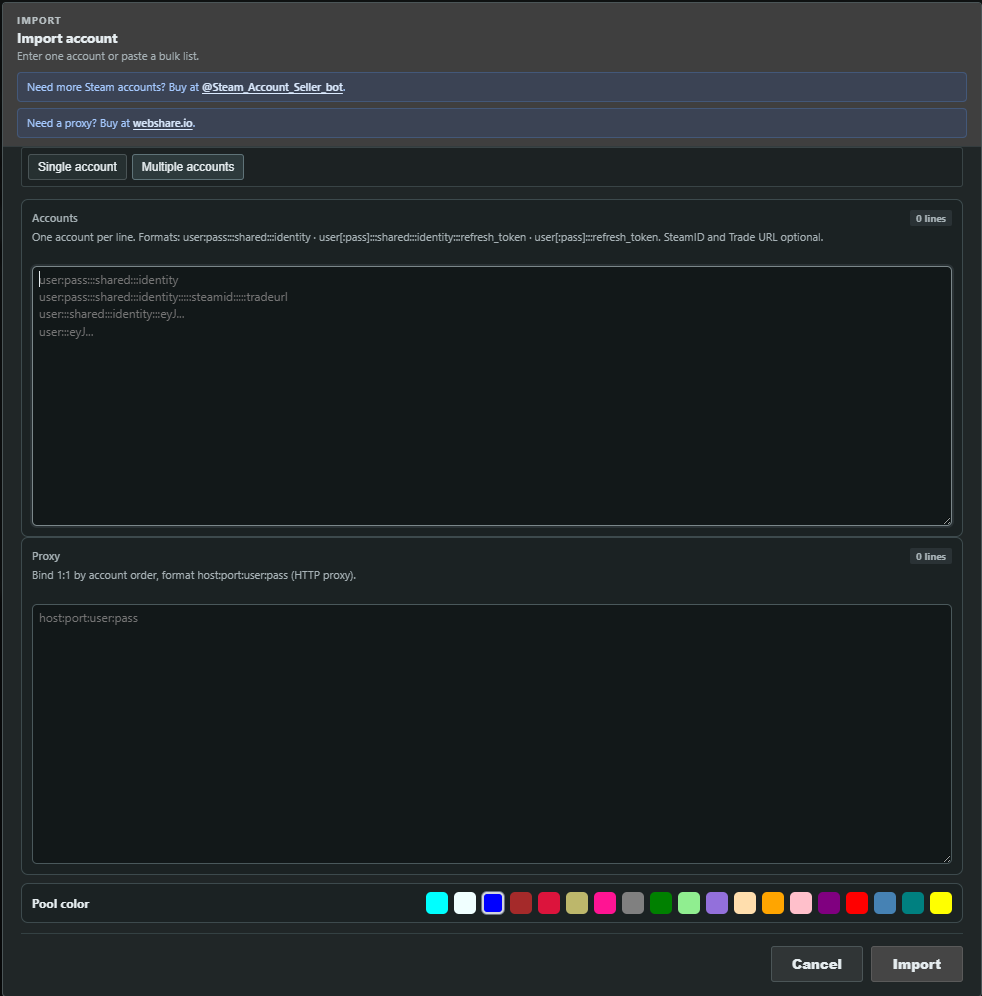
Multiple accounts
🖼
Drop this screenshot into public/assets/guide/
import-bulk.png
Import → Multiple accounts
One account per line. Proxies bind 1:1 in the same order — line 1 of proxies goes to line 1 of accounts.
Account line format (fields separated by :::). Each line picks its own mode; a refresh token, when present, is always the last field:
Lines 1–2 are User/Pass + maFile, lines 3–4 are Refresh token + maFile, lines 5–6 are Refresh token only. You can mix modes in one paste. If a line has both a SteamID and a token, they must match. Export writes the same formats back, so a backup can be re-imported as is.
Proxy lines:
host:port:user:pass
The counters turn green when lines parse. Red/warn means a line has no password and no token, only one of the two secrets, or an invalid proxy. Bad tokens or secrets are reported per line after you click Import. Extra proxy lines are ignored; missing proxies block those accounts.
After you import an account
Do not log in manually. Workers pick up the new row and run the bootstrap: Steam session, trade URL, inventory, then marketplace registration when that marketplace is granted to you.
What to watch in the table
Proxy — live (green) vs die. Fix die proxies first.
Session / Steam — logged in, trade URL present, maFile OK, no Steam/trade ban.
CSGOTM / WhiteMarket / ShadowPay tabs — API key or JWT, online, can sell. Enable/disable sales from the context menu.
Message column — last Steam or worker error (expired token, bad proxy, need password, …).
Marketplace sales start enabled after a successful bootstrap if your user was granted that marketplace. You can turn a site off per account without disabling the Steam account.
Inventory appears on Inventory after the first inventory sync. Items are not listed until you set min and max.
Turn on Accept gift trade from the Steam context menu if you want incoming marketplace trades auto-accepted.
Context menu
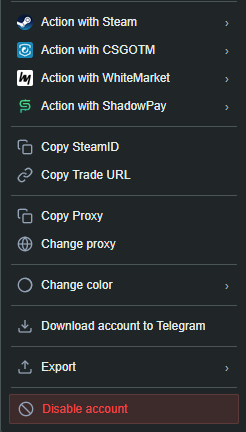
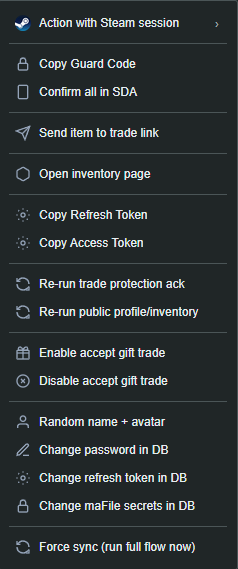
On Accounts, right-click a row. If several rows are checked, the menu applies to the selection. Some actions work only on a single account and appear disabled when many are selected.
Path: Accounts → right-click row
🖼
Drop this screenshot into public/assets/guide/
accounts-context.png
Account context menu
🖼
Drop this screenshot into public/assets/guide/
steam-actions.png
Action with Steam
Action with Steam
The most useful items live under Action with Steam. Opening Steam in the browser and logging into other sites are explained in Steam session & 3rd-party login.
Other Steam actions
Copy Guard code, refresh token, access token
Confirm all in SDA (mobile confirmations)
Send item to a trade link (pick items from this inventory and optionally the partner)
Open this account on the Inventory page
Re-run trade protection acknowledged / public steam inventory
Enable / disable accept gift trade
Random name + avatar
Change password / refresh token / maFile secrets stored in BuyCS2 trade server (not a Steam password reset unless a worker does that later)
Force sync — run the full Steam job now
CSGOTM / WhiteMarket / ShadowPay
Each submenu: enable or disable sales on that site, force sync, and (single account) copy CSGOTM API key, send CSGOTM balance, or copy WhiteMarket JWT. A greyed-out marketplace means your user was not granted that site — ask an admin.
Common actions
Copy SteamID, Trade URL, or proxy
Change proxy (bulk editor keeps login ↔ line alignment)
Change color (palette)
Download account ZIP to the bound Telegram chat
Disable account — jobs stop; the row moves to the Disabled tab. You can enable it again or delete it there.
Double-click Reminder, Note, or Proxy cells to edit without the menu. Paste several reminder lines to fill consecutive visible rows.
Inventory context menu
Right-click an item to highlight/unhighlight it, copy the inspect link, or open the same item on CSGOTM / WhiteMarket / ShadowPay.
Open Steam and log into other sites
You never type the Steam password in the browser. BuyCS2 trade server opens a live Steam session through that account’s proxy — Store, inventory, or any site that supports “Sign in through Steam”.
Path: Accounts → right-click → Action with Steam → Action with Steam session
These actions need exactly one selected account. If several rows are checked, the session items stay disabled.
🖼
Drop this screenshot into public/assets/guide/
steam-session.png
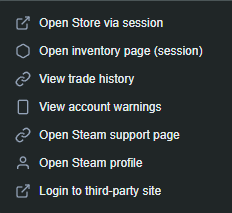
Action with Steam session
Open Steam already logged in
A new tab opens a Steam page as that account. Every request goes through the account proxy, so Steam sees the same IP the workers use. Use this to check inventory, trade history, warnings, or support without logging in by hand.
Right-click one account → Action with Steam → Action with Steam session.
Pick the page you need:
Open Store via session — store.steampowered.com
Open inventory page (session) — that account’s CS2 inventory
View trade history — Steam trade history
View account warnings — open Steam warnings if the account is Steam-banned or restricted
Open Steam support page — help.steampowered.com
Open Steam profile — community profile
You can keep browsing Steam in that tab: links stay inside the session.
Log into any site via Steam
Works on marketplaces, bots, and tools that have a Sign in through Steam button. BuyCS2 trade server finishes the OpenID login as the selected account — you do not enter login or password on that site.
On the other site, click Sign in through Steam (or the Steam icon).
The browser jumps to a Steam OpenID URL. It usually starts with https://steamcommunity.com/openid/login?.... Copy the full URL from the address bar before you click Sign In on Steam.
Back in BuyCS2 trade server: right-click the account → Action with Steam → Action with Steam session → Login to third-party site.
Paste the OpenID URL and confirm. A new tab opens already authorized as that Steam account.
If the URL does not contain /openid/login, you copied the wrong page. Start the Steam login again on the third-party site and copy the address as soon as Steam’s OpenID page appears.
This is the fastest way to open CSGOTM, WhiteMarket, ShadowPay, or any other Steam-login site on a specific account without switching cookies or typing 2FA.
Min / max / buy price
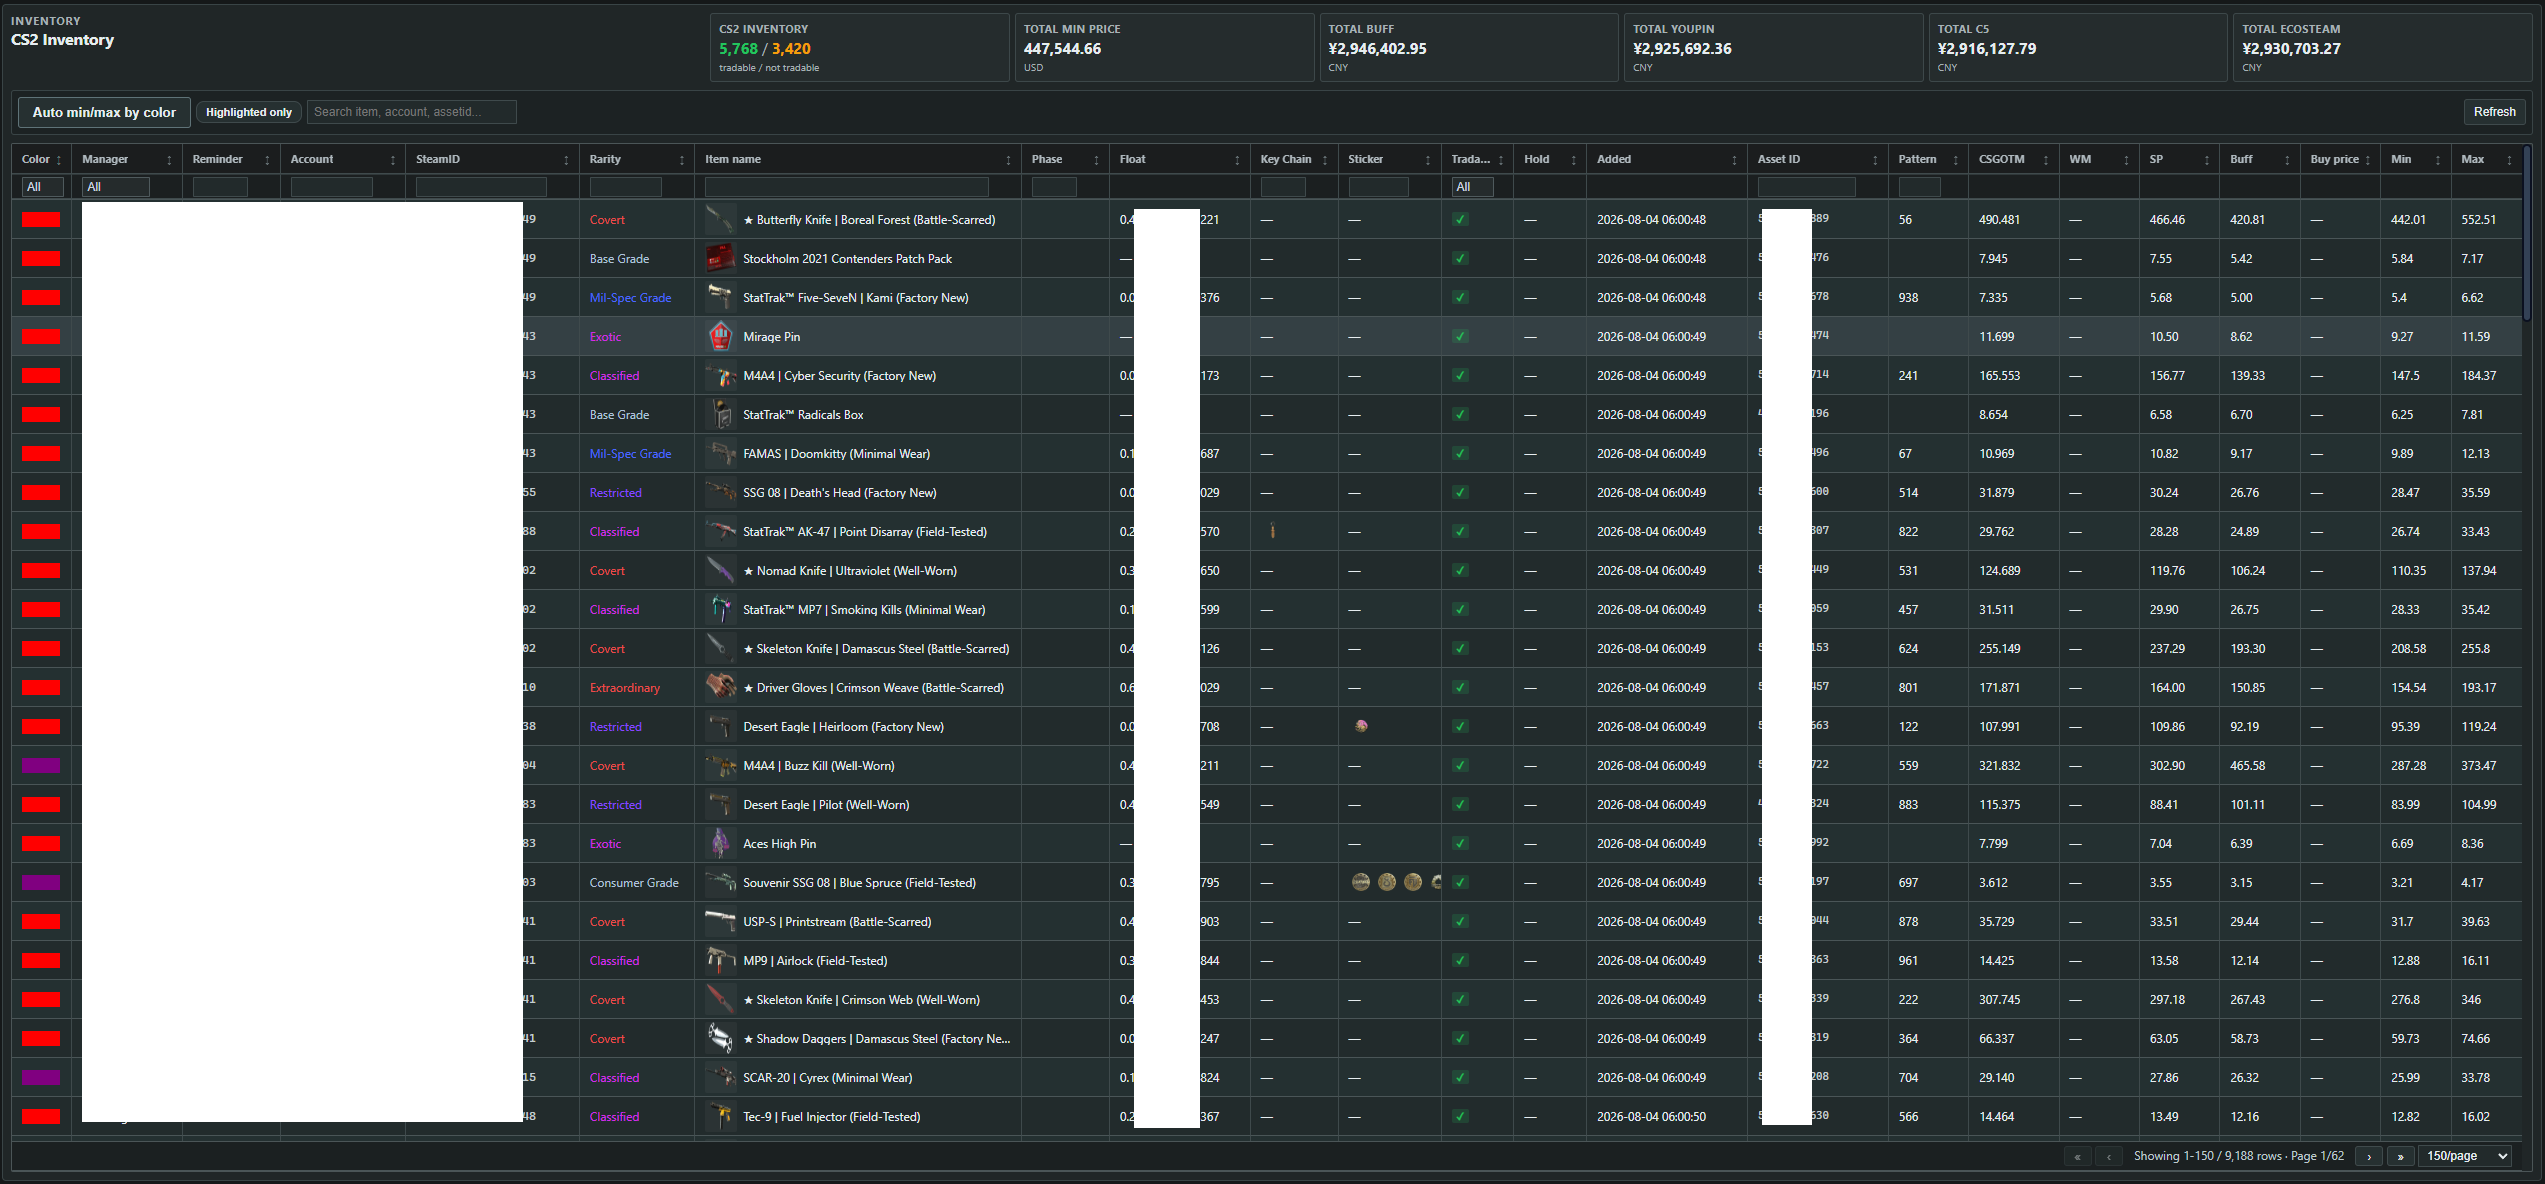
Open Inventory. Workers list an item only after min and max are set. Empty or zero = not for sale.
Path: Inventory → double-click min / max / buy
🖼
Drop this screenshot into public/assets/guide/
inventory-minmax.png
Inventory — min, max, buy columns
What the columns mean
min (floor) — the minimum USD you want to keep after sell + withdraw fees. The bot adds fees onto the listing so your net is not below this. It never lists below min.
max (ceiling) — the highest USD price the bot lists first, or raises back to when nobody is cheaper. max must be ≥ min.
buy (cost) — what you paid for the item. Optional. It does not change the listing price; it is only for profit/loss in sales history.
Example: you want $10 net and marketplace fees (e.g. CSGOTM) total 10%. Set min = 10 — the bot lists about $11.11 so you still get $10 after fees. Set max = 12 if you want to start higher when there is no competitor, then drop toward $10 when someone is cheaper.
Quick actions
Edit — double-click a cell → type the number → Enter to save (Esc to cancel).
Filter — only changes what you see on screen. It does not change prices on other items.
Highlight special items — right-click → Highlight rare/expensive rows so auto min/max skips them and does not overwrite those prices.
Auto min/max by color
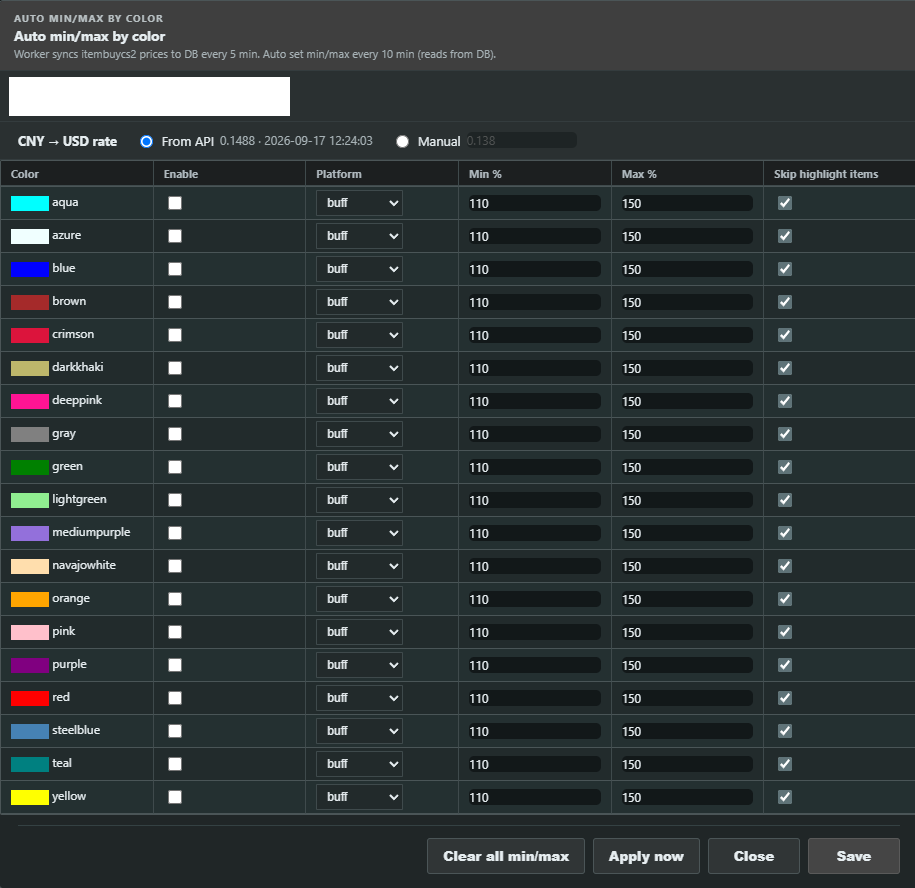
If you do not want to type min/max on every item, open Auto min/max by color on the Inventory toolbar. Rules apply to all items whose account color matches the row.
Path: Inventory → Auto min/max by color
🖼
Drop this screenshot into public/assets/guide/
auto-min-max.png
Auto min/max by color
How it is calculated
A worker copies Buff / Youpin / C5 / Ecosteam prices (CNY) from itembuycs2 into the database about every 5 minutes.
About every 10 minutes (or when you click Apply now) BuyCS2 trade server reads those DB prices, converts CNY → USD, then:
min = USD_price × (Min % / 100)
max = USD_price × (Max % / 100)
Example: Buff = ¥800, rate = 0.14 → $112. Min % = 110, Max % = 150 → min = $123.20, max = $168.00. Defaults if you never saved a row: platform Buff, min 110%, max 150%, skip highlighted items.
CNY → USD rate
The rate selector sits above the table and applies to all your colors. From API (default) pulls the live CNY → USD rate from a public exchange-rate API, caches it and refreshes it on a timer; if the API is down, the last cached rate is kept. Manual lets you type your own rate (a number greater than 0), which is then used as is until you switch back. Change it when you want a more conservative conversion than the market rate.
Columns in the modal
Color — account pool color (same as Import / context menu).
Enabled — only enabled colors are applied on the timer and on Apply now.
Platform — buff, youpin, c5, or ecosteam.
Min % / Max % — multipliers on that platform’s USD price.
Skip highlighted — do not overwrite min/max on items you marked. Recommended for knives / high-tier skins you price by hand.
Save stores the table. Apply now runs once immediately. Clear all min/max wipes prices (including manual ones) — confirm first.
After min/max exist, marketplace workers list the item and compete between min and max. You do not need to open each marketplace by hand.
Trades and sales
Open Trade History in the top nav. Sub-tabs cover outgoing trades, incoming trades, marketplace sales, and suspicious trades.
Path: Trade History → Send / Receive / Sell
Outgoing and incoming trades
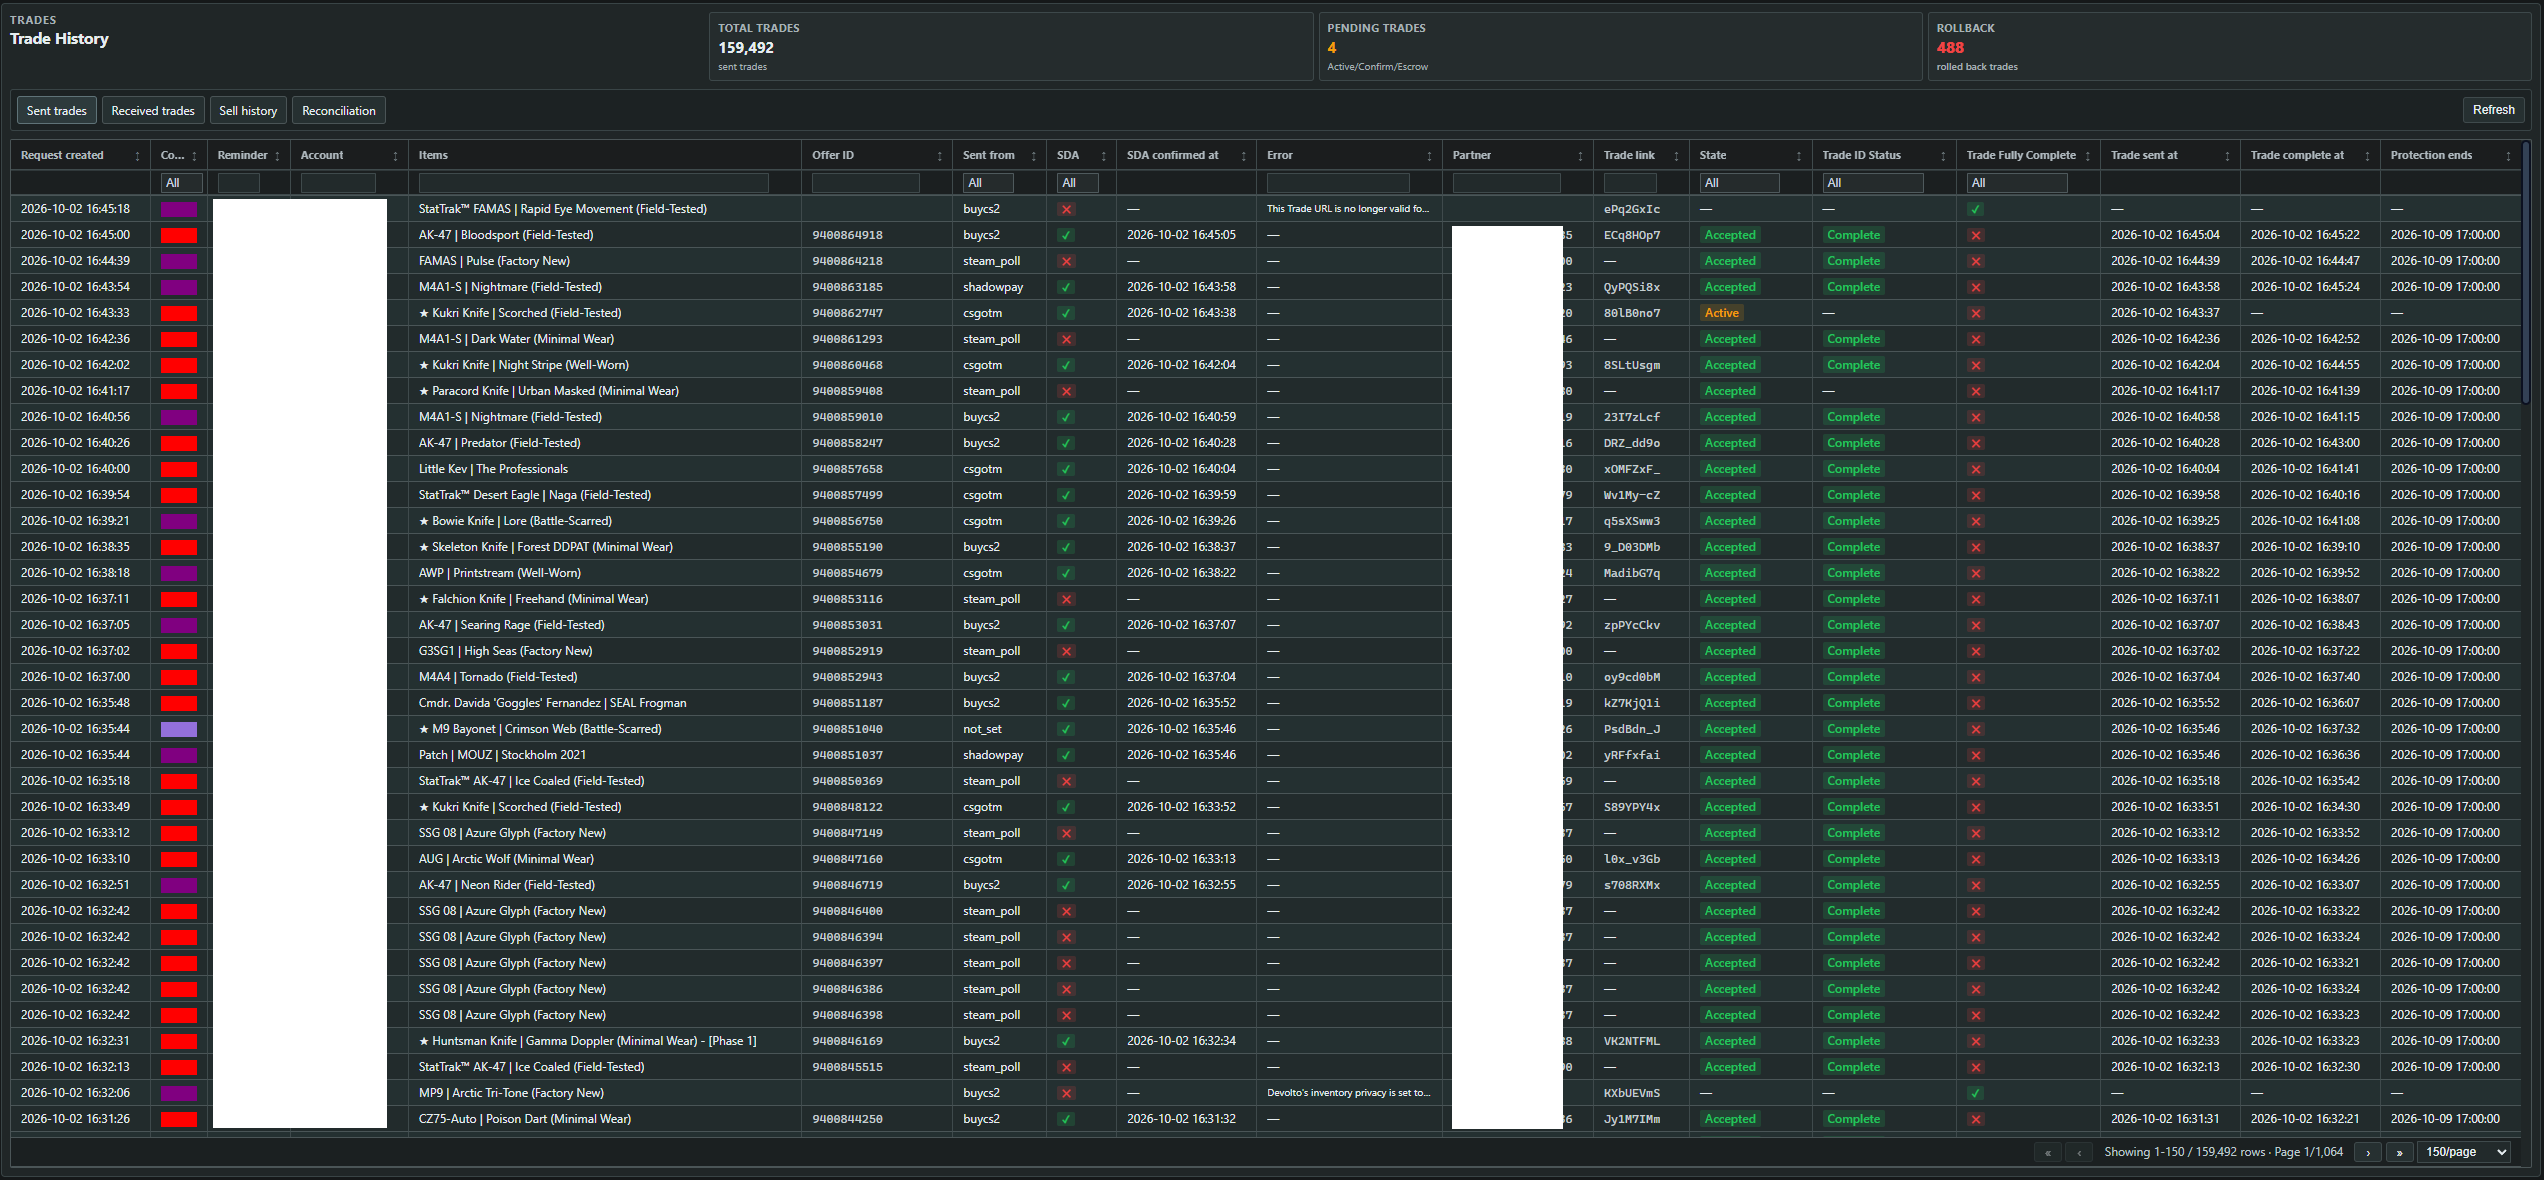
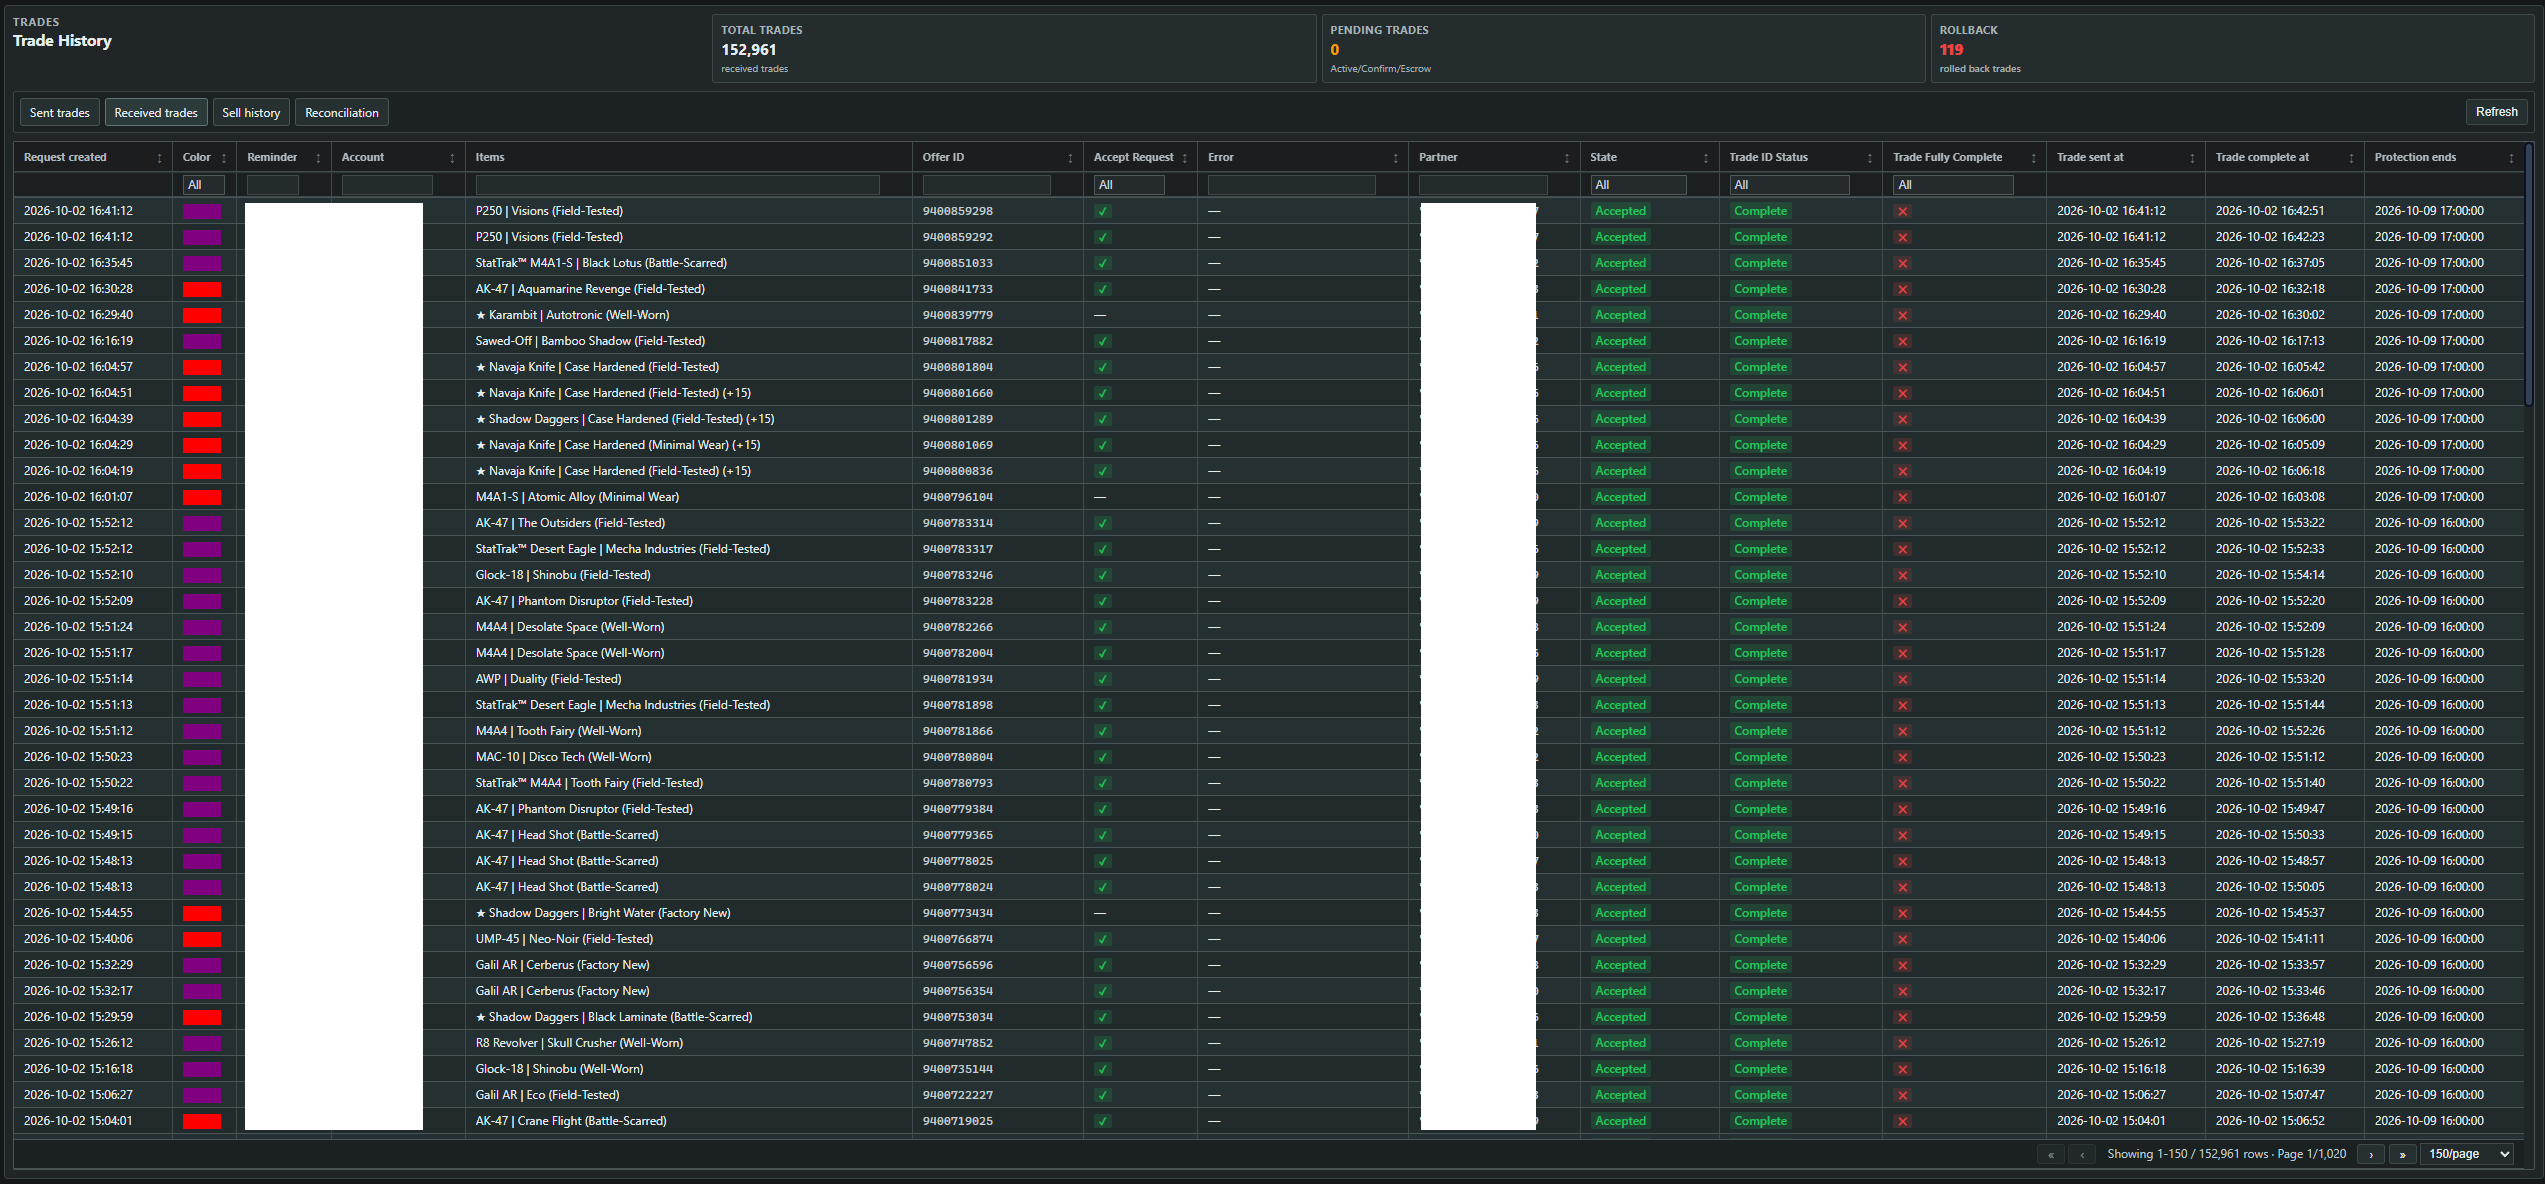
The Send tab lists Steam trade offers BuyCS2 trade server is sending (marketplace payouts, manual send-trade). You can see item, partner, status, and whether the offer was confirmed. Receive is the same for incoming offers.
🖼
Drop this screenshot into public/assets/guide/
trade-history.png
Trade History — sent trades
🖼
Drop this screenshot into public/assets/guide/
trade-receive.png
Trade History — received trades
Sales history
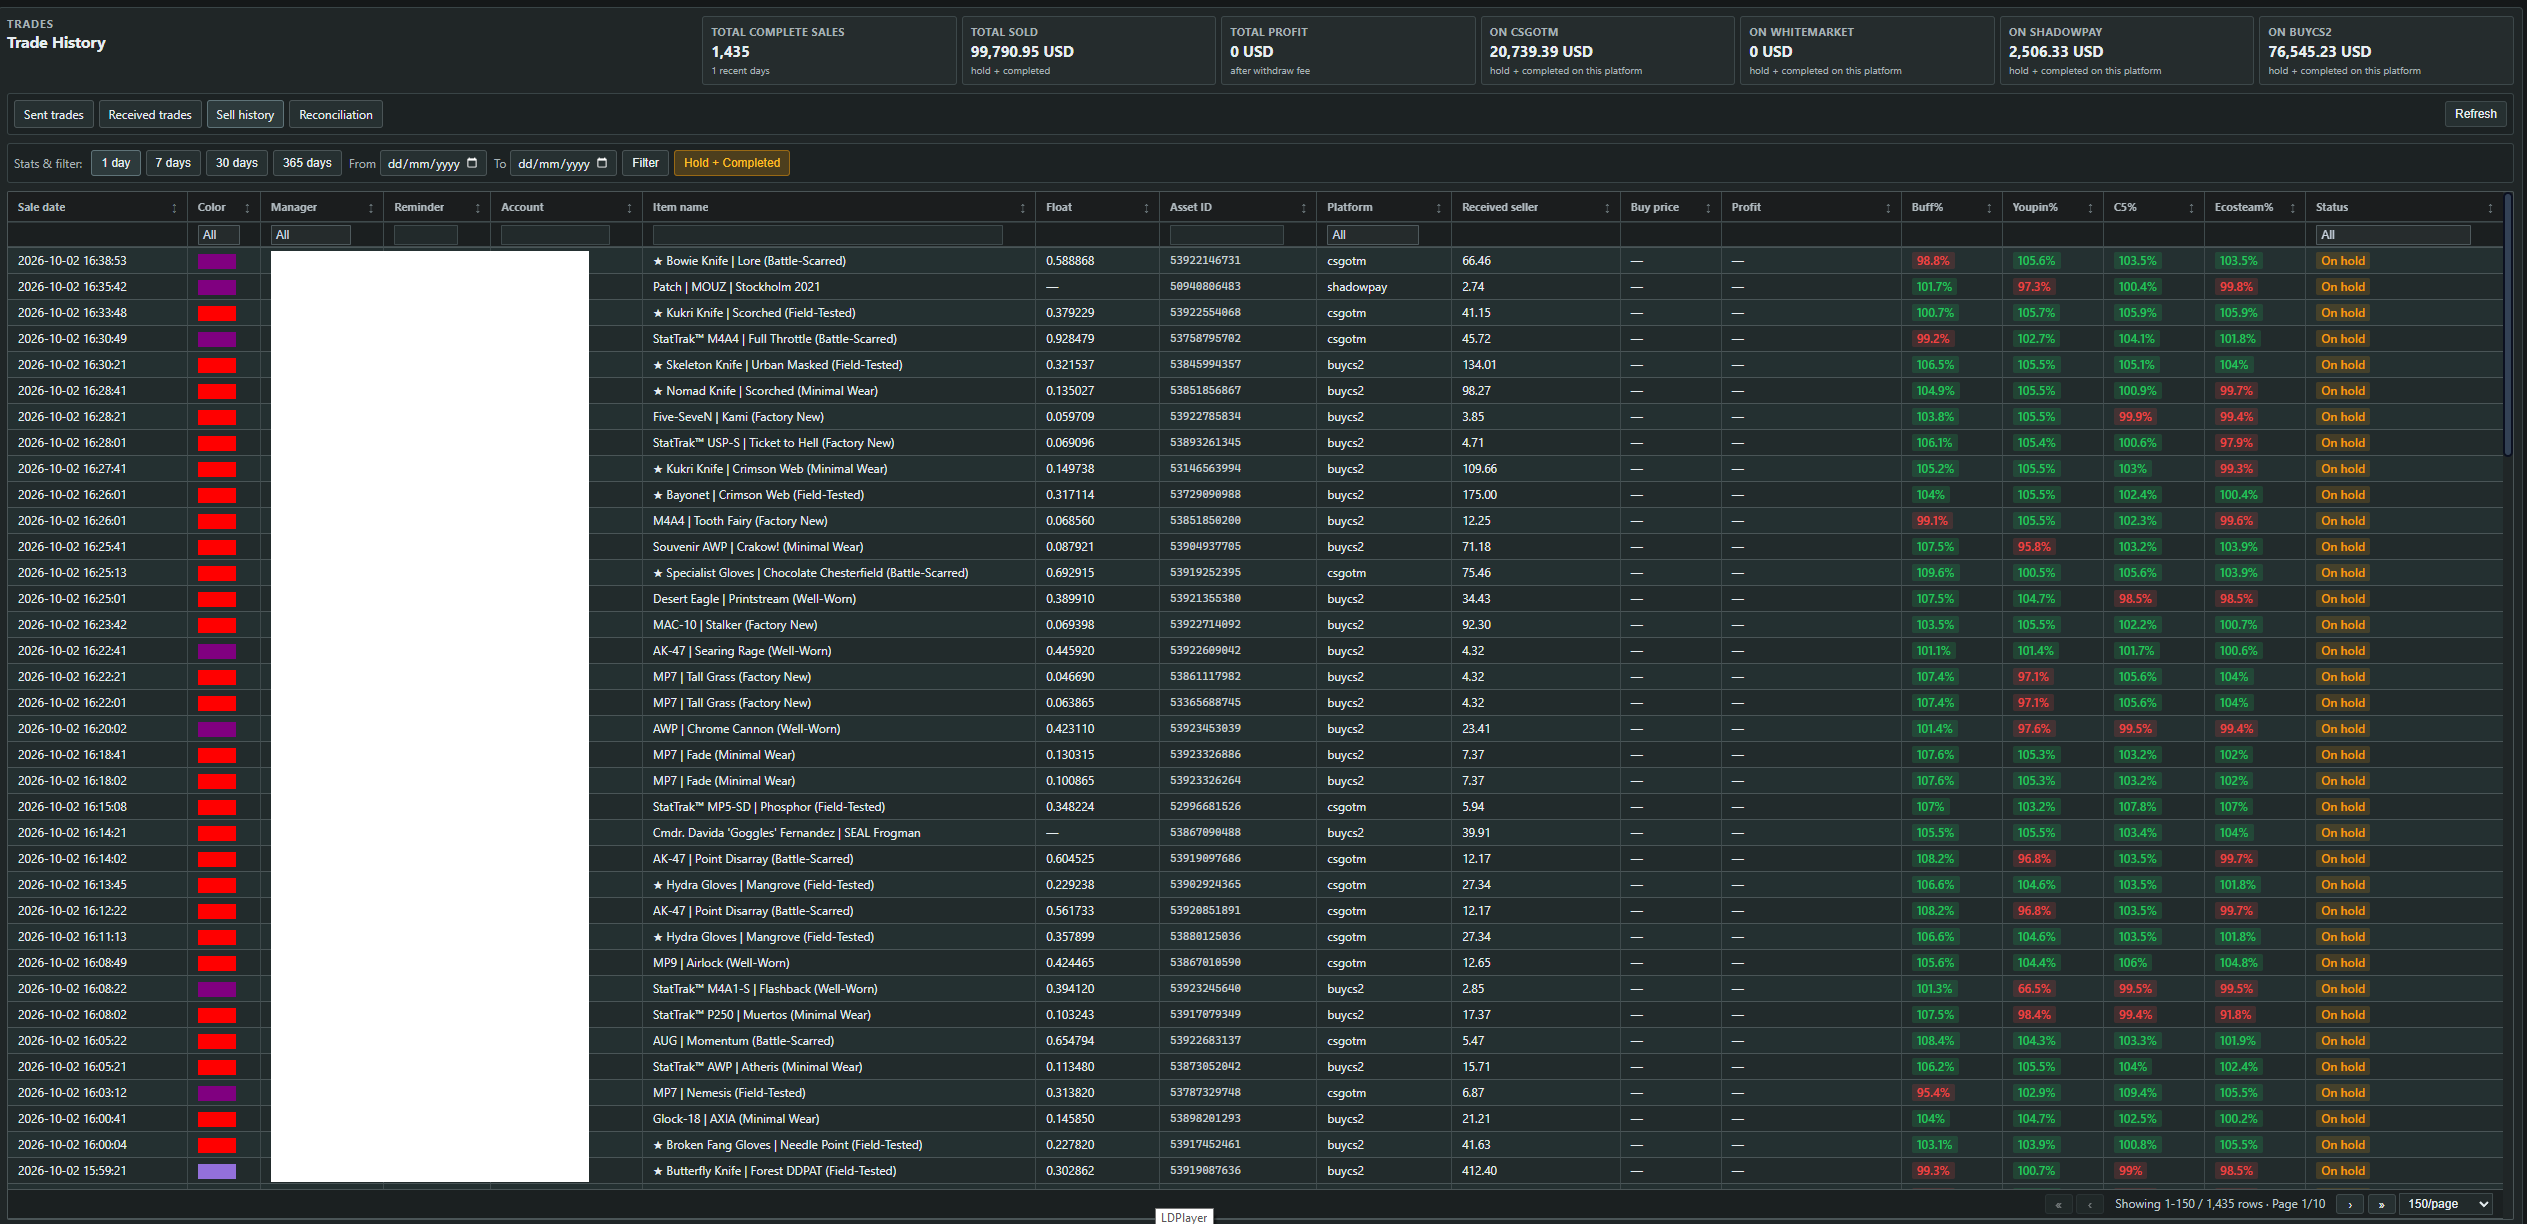
The Sell tab is the marketplace sales ledger: item, platform, sale price, profit vs buy price, and hold status. Totals at the top show completed sales, profit, and per-marketplace volume.
🖼
Drop this screenshot into public/assets/guide/
sell-history.png
Trade History — sales
Profit columns need a buy price on the item (set on Inventory). Without buy price, profit stays empty.
Suspicious sales are flagged on the Suspicious tab. Examples: an item was sold but is missing from the marketplace history, or the hold is overdue and the platform has not credited the money.